And then when you go to clicckk the picture the link sends you to tumblr or to some other site that doesn't have the instructions on how to make that thing you reallllyyyy want to make.
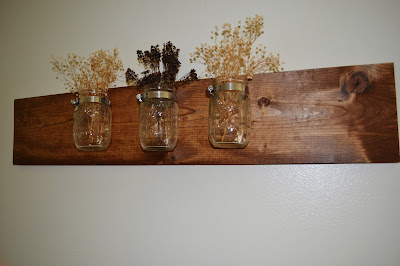
This happened to me a few days ago when I saw this beautiful piece of decor.
All of my buried feelings of wanting to be a crafty wife came rushing in and I knew I had to make it.
It had me written all over it.
But not a single link I found had a tutorial. So my wonderful friend Stephanie and I decided we would figure it out.
Enjoy!
Step 1: You can either use some leftover wood or head over to Lowes or another hardware store to get some cheap wood. We chose some pinewood that wasn't too nice but was also nice enough that we wouldn't get a splinter every time we touched it. Lowe's is also great because they will also cut the wood for free. We bought a 6 foot piece of wood so that we would both have 3 feet to work with.
Step 2. While at your local hardware store make sure to get a stain color that you like. We decided on the "Early American" because it had more of a rustic look to it.
Step 3: Head over to the plumbing isle at said hardware store and buy a stainless steel clamp. I wish there was a better specific name for this little guy. It took us a long time to figure out what it was in the picture that held the mason jars to the board. Just remember they are in the plumbing isle and look like this.
Step 4: Now if you don't own mason jars, Hobby Lobby is a great place to get them. If you go during there 50% off glass sale you can get mason jars for one bone each. Heck yes. Also you can always get 40% off of one item if you look it up online or bring it in the store. Hobby Lobby loves us.
Step 5: After your wood is stained and dried you will need to get your clamps and nail them onto the board. Since neither Steph or I had a drill we found that on the back of the clamps there are these awesome slits that a nail can slip through-- so we just got a hammer and nailed that sucker into the wood!
Step 6: Attach the mason jars by screwing the clamps around them...like so...
(By the way, if you want everything to match up perfectly I strongly suggest
using a tape-measure throughout this entire process)
Step 7: While at your local hardware store find something that can connect your wood to the wall. I got these at Lowes and they worked out great!
(Please don't judge my ugly hands and chipped nail polish...it was craft day...not beauty day.)
And then voila!!!! You have a beautiful piece of decor to add to your home!
Here are some more finished pictures.
Cost:
3' Wood: $2.82
Stain: $2.39
3 Clamps: $3.06
Baby's Breath: $6.99
3 Mason Jars: $2.97
Total: $18.23
This price really isn't too shabby. You could also cut back a lot depending on if you have Mason Jar's, if you complete the project with a friend which cuts spending in half, and what you put into the jars.
Well there you have it! I hope you enjoy making this as much as I did :)
Love, Lauren Lindsey


.JPG)


